PSEB Solutions for Class 9 Computer Science Chapter 3 MS Excel Part-I
PSEB 9th Class Computer Solutions Chapter 3 MS Excel Part-I
INTRODUCTION OF MS EXCEL
Microsoft Excel is a spreadsheet program. It is product of Microsoft company. It is used for organizing and calculating numerical data. Automatic calculations can be done in excel. Data can be formatted in any style and layout to meet our all requirements. Excel can also produce a range of charts and graphs that can be used to present the data in a graphical manner.
Features of MS Excel
Some of the features of Excel are as described below :
1. Easy Data Analysis: Excel provides advanced tools of data analysis like Sorting, Filtering, Charts, Pivot Tables, Goal Seek etc.
2. Conditional Formatting : Conditional formatting on data based on different rules and conditions can be done in excel. It helps in highlighting important facts from data or information.
3. Data Validation Data can be validated based on certain criteria while entering.
4. Easy to Store and Find Data : There is no limit of the amount of information that can be saved in a spreadsheet. Finding data is easy using find command.
5. Application of Formulas : A lot of formulas can be used in excel. Performing calculations in Excel are easier and less time-consuming by using different formulas.
6. Data Protection : Sheets and workbooks of Excel can be protected using passwords for different access.
7. Organized Data : It is convenient to store our different data in multiple worksheets in a single Excel workbook.
COMMON USES OF MS EXCEL
Following are the some common uses of MS Excel :
(i) Excel can be used for mathematical calculations.
(ii) Data can be represented in a graphical format with the use of Charts.
(iii) Timetable can be prepared for school.
(iv) Salaries of employees can be calculated.
(v) Results of students can be prepared in Excel.
(vi) Excel can be used for data storage and any type of calculations.
HOW TO START MS EXCEL ?
Following methods are used to open Excel :
(i) Start

→ All Programs → Microsoft Office → Microsoft Office Excel 2010
OR
(ii) Type “Excel” in search bar. Excel program will appear in the start menu.
(iii) Press enter button after selecting EXCEL program.
OR
(iv) Click on Excel program from the program menu.
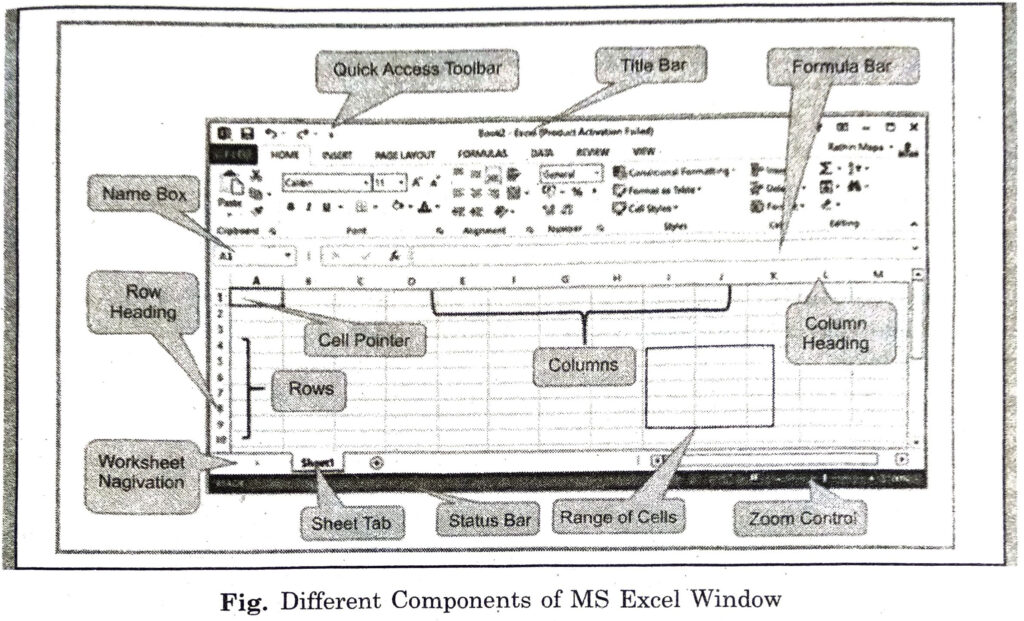
COMPONENTS OF MS EXCEL WINDOW
The various components of MS Excel Window are :
1. Quick Access Toolbar: It can be seen on the left-upper corner of the screen. It displays the most frequently used commands of the Excel. This toolbar be customized based on our choice.
2. Title Bar: The title bar of the spreadsheets located at the top of the window. It presents the name of the active filename and program name itself. It also have some buttons contained in it.
3. Control Buttons: These buttons are present in the upper-right of the window which allows us to modify, the minimize, maximize/restore and close the workbook.
4. File Tab: This tab of Excel represents a menu which is used to perform file related operation. Basic operations present in this menu are :
(i) to create new excel documents,
(ii) open an existing file,
(iii) save, save as,
(iv) export,
(v) print file, etc.
5 Tabs The name appeared for each related tab, below the title bar of MS Excel. These tabs are called Menu bar. The various menus are: File, Home, Insert, Page Layout, Formulas, Data, Review, View, Help and a Search Bar with a light bulb icon. All these menus have sub categories.
6. Ribbon/Toolbar: There are series of elements which are part of each menu bar. On the selection of any Menu/Tab, a series of command options/icons will be displayed on a ribbon.
(i) Tabs Tabs are the top section of the Ribbon and contain groups of related commands. Home, Insert, Page Layout, Formula, Data etc. are the examples of tabs.
(ii) Groups: These organize related commands. The name of each group appears below the Ribbon.
(iii) Commands: These appear within each group as mentioned above.
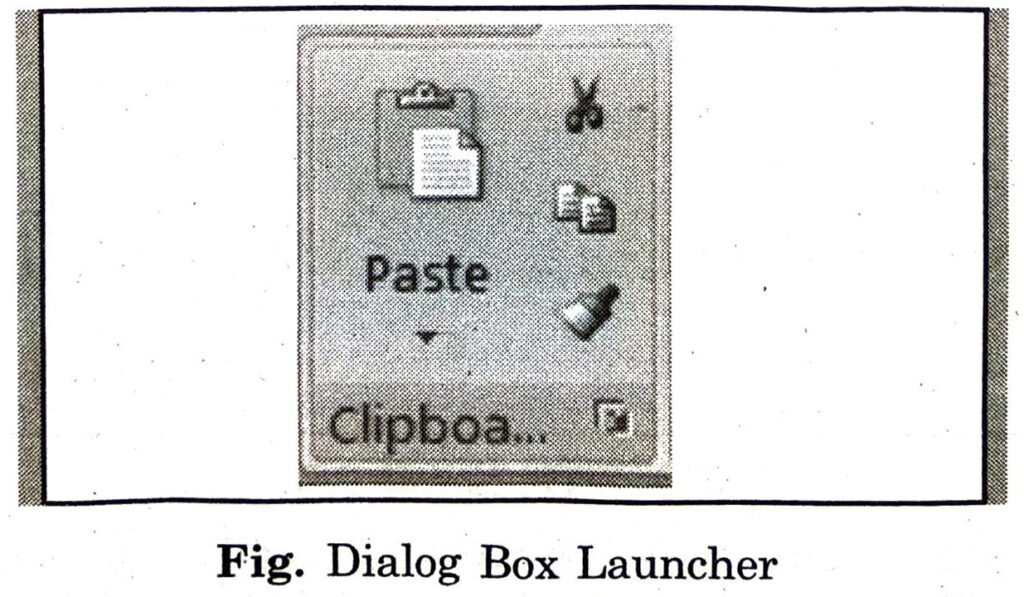
7. Dialog Box Launcher: This is a very small arrow located in the lowerright corner of a command group on the Ribbon. Command group related dialog box can be opened to perform advanced operations related to those commands.
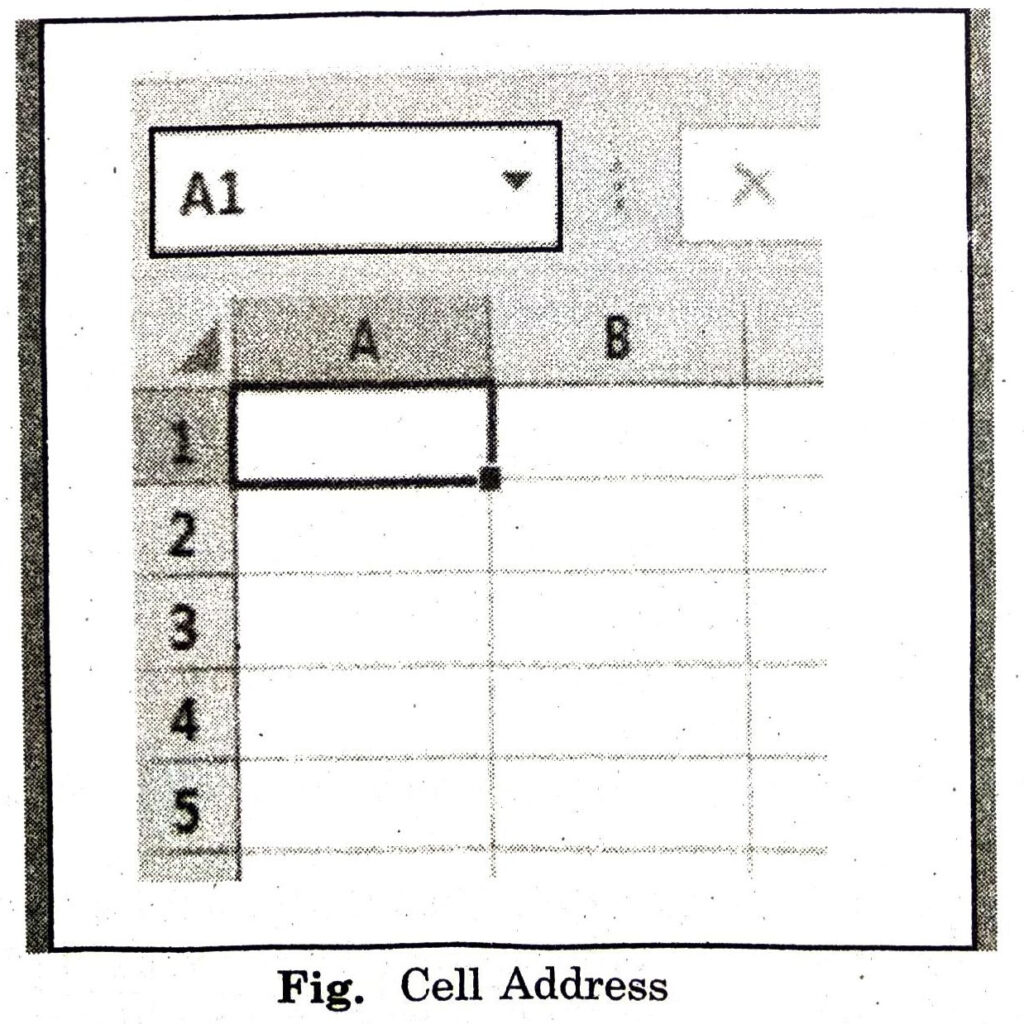
8. Name Box: This is a first and left part of formula bar. It shows the address of active cell, row or column. Selection can be made using this part of Excel.
9. Formula Bar: This part of Excel is used to display cell contents or formula written within a cell. Data can be edited using this bar. This bar is an area just below the ribbon area and on right side of name box.
10. Scroll Bars: These are the slider which appeared on right and bottom side of spreadsheet. It allows to slide vertical and horizontal direction of the spreadsheet. Mouse wheel can be used to automatically scroll up or down or arrow keys can be used for this purpose.
11. Spreadsheet Area: It is the working area of Excel. It contains the entire spreadsheet with its rows, columns and cells. Each spreadsheet area having column header is known as Column Bar. It is displayed at top and row header at left side of the screen known as Row Bar. Columns are represented using Alphabets like A,AB,BCC etc. Rows are represented by numbers starting from 1. The active cell is represented using a bold rectangular area in the spreadsheet. The blinking vertical bar is called cursor. It is the insertion point. It indicates the insertion location of the typing. That means data is typed in that place of insertion point.
12. Leaf Bar: It is used to display sheet names. It appears at the bottom of the working area. There can be multiple worksheets in one Excel file. This sheet bar explains the spreadsheet that is currently being used. We can add a new sheet or remove one using this part of Excel.
13. Status Bar : This bar is located at the bottom of the window. It shows current status of worksheet. It also displays other important information related to spreadsheet. It also shows the information if anything goes wrong, or the document is ready to be delivered or printed. Status bar displays quick calculation of the selected data like sum, average, count, maximum, minimum etc. The status bar can be configured by right-clicking on it. We can insert or remove any command.
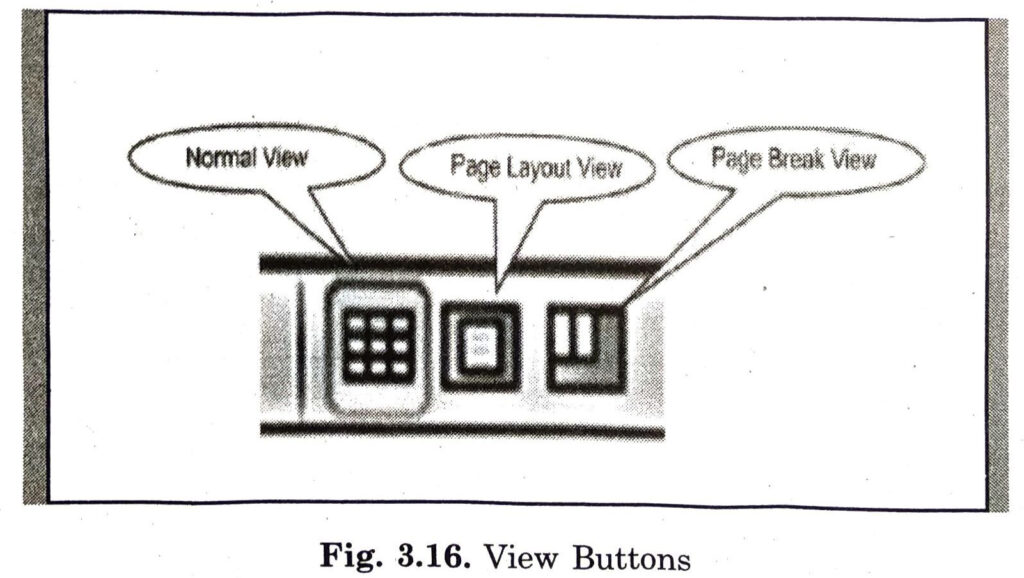
14. View Buttons: It is a group of three buttons arranged at the left of the Zoom control. It is close to the right-bottom of the screen. Three different types of Excel views can be seen with the help of these buttons such as:
(i) Normal View: This displays the Excel page in normal view.
(ii) Page Layout View: This displays the exact view of MS Excel sheets as these are going to be printed.
(iii) Page Break View: This shows page break preview before printing to adjust page layout easily.
15. Zoom Control : Zoom control is located at the lower-right area of the window. It allows us to ZOOM-IN or ZOOM-OUT a particular area of the spreadsheet.
It is represented by magnifying icons with the symbols of maximizing (+) or minimizing (-). It allows to easily manipulate data by clicking on any of these icons.
16. Active Cell: An Active Cell is a cell of spreadsheet in which currently work is done. The active cell is always represented by a bold rectangular box.
MS EXCEL TERMINOLOGY
Following terms are commonly used in Excel :
1. Workbook: An Excel file is called a workbook. A workbook is a collection of the worksheets. Hundreds of worksheets can be added in a single workbook. 2. Worksheet: Worksheet is one spreadsheet of Excel which contains columns and rows and actual data. Worksheets can be insterted in workbook by pressing the button “Insert New Worksheet” from leaf bar..
3. Row: A row is a collection of all adjacent horizontal cells. It is referenced by one single row number. Rows are named as 1,2,3,4, ………. so on.
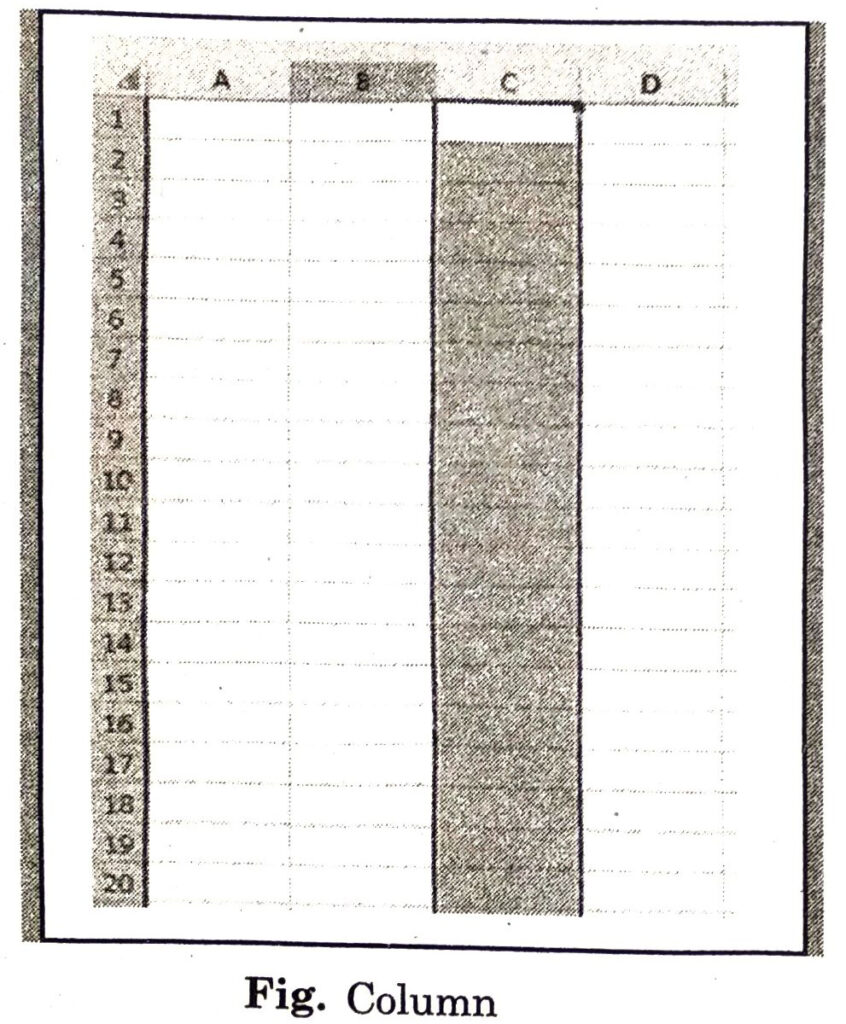
4. Column: A column is a collection of all adjacent vertical cells. They are referenced by one single column name. Columns are named as A,B,C,D,. … ,AA,AB,……… so on.
5. Cell: A cell is an intersection of a row and a column. A cell is a smallest rectangular part of our spreadsheet in which data is entered. Each cell is identified by a cell address.
6. Active Cell: The cell in which currently work is done is called active cell. A bold rectangular box around the cell identifies an active cell. Contents of active cell are always displayed in formula bar. The address of active cell is always displayed in Name box.
7. Cell Address: Every cell in Excel worksheet has a unique address. Cell address has a column letter followed by a row number. For example, A1 is the intersection of the column A and row 1.
Comparison between Worksheet and Workbook
The differences between Worksheet and Workbook are :
| Worksheet |
Workbook |
| 1. Worksheet refers to a spreadsheet or a page of Excel. |
1. Workbook is a File created of Excel which may consist of number of worksheets. |
| 2. It contains rows and columns. |
2. It contains worksheet. |
| 3. There can be many worksheets in one workbook. |
3. No workbook can exist within a worksheet. |
| 4. No worksheet can be saved without workbook. |
4. Workbooks are saved individually with the extension .xlsx. |
| 5. Worksheets are used to have our data of one type in the form of spread-sheet. |
5. Workbooks are used to have different type of data to be stored in different sheets as a one file. |
| 6. Worksheet do not have extension. |
6. Workbook has an extension. |
| 7. Worksheet cannot open without workbook. |
7. Workbook can be opened without any worksheet. |
WORKING WITH DATA IN EXCEL SHEETS
Basic Functioning in Worksheet
The basic functions on Data that can be performed in the Excel Worksheet are :
1. Entering Data : Data can be entered in any of cell of worksheet. For entering new data in a cell, firstly place the cursor in the cell in which we want to enter data. Type the required data to be entered into our cell. Following keys help in data entry :
- Enter key is used to complete the entry of data into one cell and moving to next cell of same column.
- Tab key can also be used to complete the entry of data and move to the next cell in the same row.
- Alt+Enter key is used to change line within cell itself and keep entering the data.
- Delete key is used to delete data during the data entry.
- To change the active cell position arrow keys are used. Arrow keys can be used in the edit mode of a cell which got active by pressing F2 key.
Data entry within a cell may contain two types of data :
- Entering Formula or Function: Any formula can be entered followed by equal (=) sign. For Example : = A1 + B1
- Entering Contents other than Formula or Function: Data can be stored to describe data or facts. Any type of data can be entered without using any sign before contents. For Example: “Computer”.
2. Editing a Cell Data : The data can be edited by pressing F2 after selecting that particular cell or just double click within the cell the contents of cell can also be edited by using the Formula bar.
3. Deleting Data : To delete the entire contents of one or more cells, just press delete button from the keyboard after selecting the particular cells. In the case when partial contents of a cell are required to be deleted then F2 key or double click of mouse on the cell is used. The cell will be converted into edit mode. Arrow keys can be used in edit mode of cell and use delete or backspace key to delete the required contents.
4. Selecting Cells: Mouse is used for selecting the cells. Shift and arrow keys can also be used in combination for the same purpose.
Entering Same Data in a Row or Column
The contents of one cell to other adjacent cells in either row or column can be entered using several ways. Some of the ways are as under :
I. Using Fill Command: Same contents can be entered in multiple cells using fill command as :
- Select the cell whose contents are to be copied along with the blank cells.
- Go to Home → Edit Group → Fill option
- Many options are available for this purpose like DOWN, RIGHTLEFT, SERIES etc.
- Select appropriate required option.
Contents would be copied in all the selected cells. Following Shortcut keys can also be used for this purpose :
- Fill Down : Ctrl + D
- Fill Right : Ctrl + R
II. Using Copy and Paste : The contents of one cell to other cells can be copied using copy and paste option also as follows:
- Select the cell or cells having the contents to be copied.
- Select COPY option from Clipboard group of HOME Tab or press Ctrl + C.
- Select the cells in which the contents are to be copied.
- Now, select PASTE option from Clipboard group of HOME Tab or press shortcut key i.e. Ctrl + V.
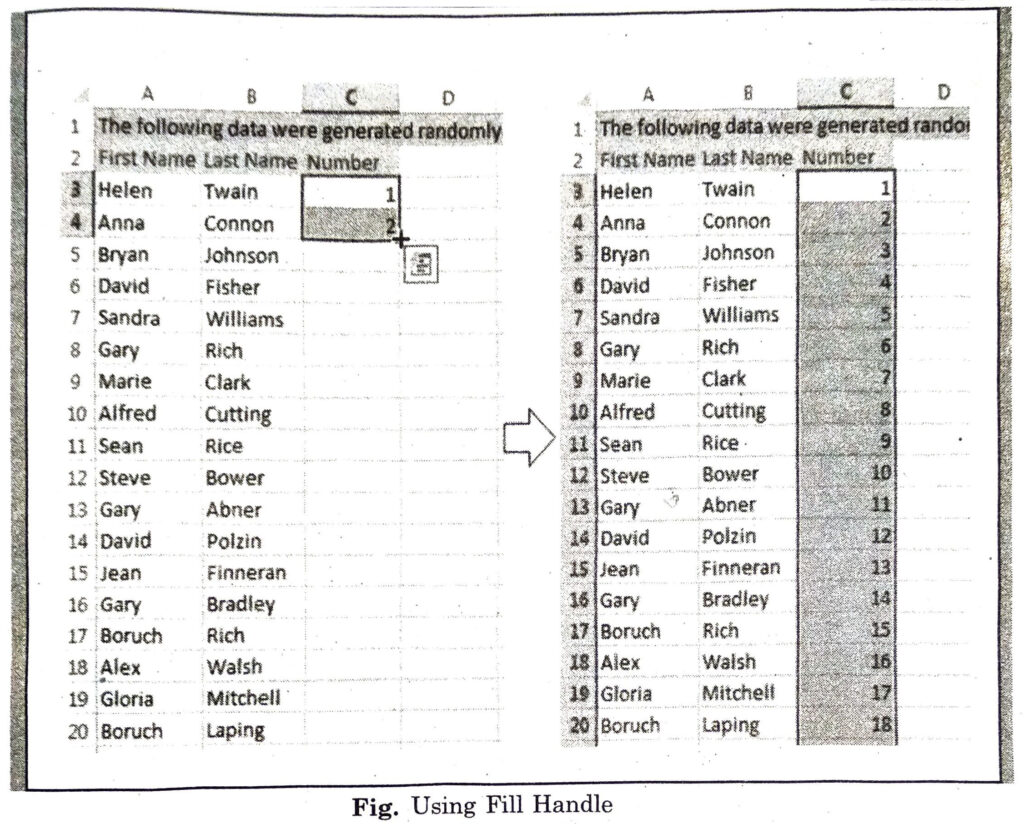
III. Using Fill Handle: This option of Excel is used for several operations. Same contents can be copied in multiple cells as under :
- Enter contents in a cell to be copied into multiple cells.
- Select the cells where contents are entered.
- Hold the fill handle of the selection and drag the mouse in required direction. i.e. Column or Row.
- Selected contents would be copied into all the cells dragged.
Working with Series in Excel Worksheets
Series is a collection of data represented by a specific category, pattern or formula. Excel provides a wide variety of series to be entered into cells, such as:
1. Series of Numbers,
2. Name of Month, and
3. Name of Days Series etc.
I. Series of Month/Day Names: Fill Handle creates the series according to the selected cells.
- Enter the series item in the starting cell. Item can be any value of the series. Series would start from the given item. For example, if June is entered into a cell then the series of Month-Names would start from June.
- Hold the Fill Handle and drag it in any direction, i.e. Row or Column.
- Series will be filled in the dragged cells. Each item of series will be entered into a single cell.
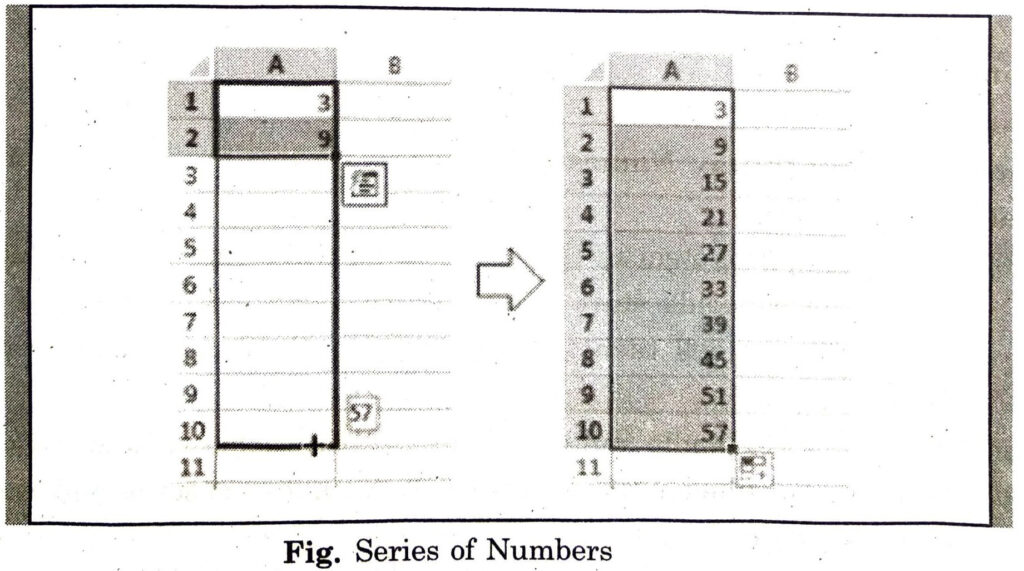
II. Series of Numbers: Number Series can be created using Fill Handle option. Number Series are the series with numerical growth. Following steps are used for this purpose :
- Enter our numbers at least in three cells as shown in the following figure.
- Select all the cells.
- Hold the fill handle and drag it in any direction. i.e. Row or Column.
- Particular number series will be entered in dragged cells. The growth of the series will be calculated by Excel itself. For example, if we enter 3 and 6 in two adjacent cells and use fill handle on these cells then the series would be 3,6,9,12 so on.
OPERATIONS ON WORKBOOK AND WORKSHEETS
Following operations can be done on workbook and worksheets.
Operations on Worksheets
Several operations can be performed over the worksheets which are contained within a workbook. Basic operations are as given below.
Inserting New Worksheet
New worksheet can be inserted using Insert Worksheet option of Leaf bar shown at Left bottom corner of work area.
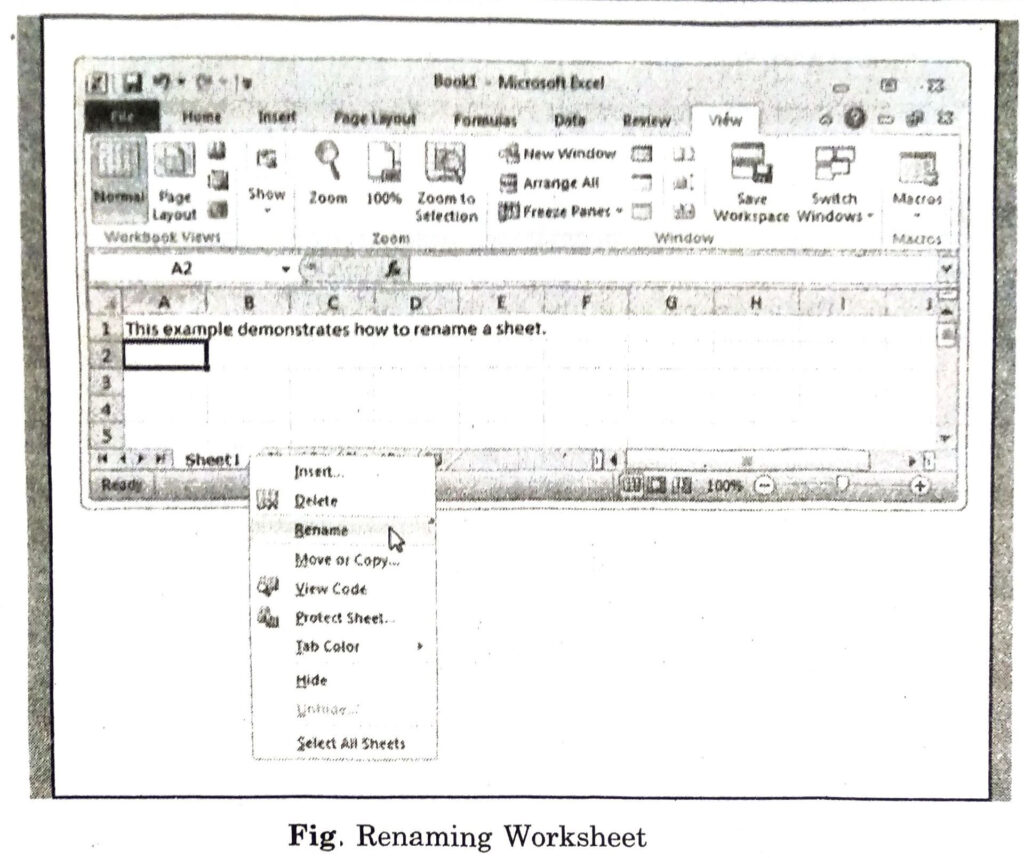
Renaming Worksheet
To rename a worksheet, follow some steps:
(i) Right click on Sheet Leaf which is required to be renamed.
(ii) Select Rename option from pop-up menu appeared.
(iii) Type the new name and press Enter to Finish.
Removing Worksheet
Unnecessary worksheet can be removed using following steps:
(i) Right click on Sheet Leaf which we want to remove.
(ii) Select Delete option from pop-up menu appeared.
(iii) Our selected sheet will be removed and respective leaf will no longer available.
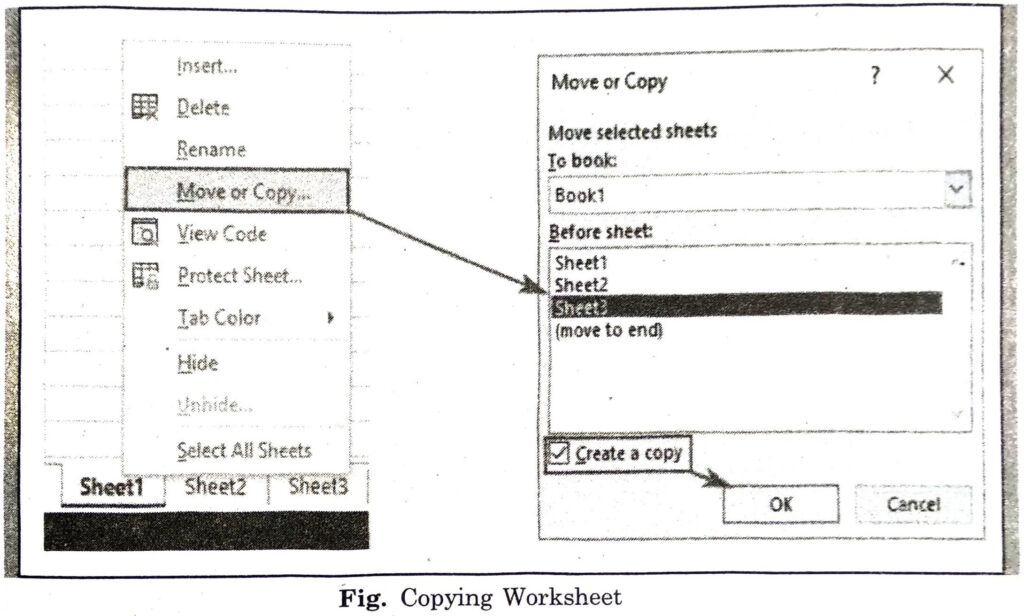
Copying a Worksheet
Following steps are used to copying a sheet :
- Right click on sheet leaf which we want to copy.
- Select Move or Copy option from pop-up menu appeared.
- Move or Copy dialog box will appear.
- Click on Create a copy option at the lower left corner.
- Select the location of sheet from Before Sheet list of dialog box.
- Press “OK” button.
Operations on Workbooks
Following operations can be performed on workbooks.
Creating New Workbook
Following steps are performed for creating a new File :
- Click File tab (a Pane will appear).
- Click New.
- A list of available templates will be displayed. select the required template or Blank workbook to be used.
- Click New. Excel will create a new file and file will be opened.
Ctrl+N is used for creating a new file in MS Excel.
Saving Workbook
A workbook can be saved using following steps :
(i) Click File tab and a Pane will appear.
(ii) Click Save. The Save As dialog box will appear.
(iii) Go to the directory/drive in which we want to save our file.
(iv) Type suitable name for file in the File Name field.
(v) Click Save. Excel will save our file. Ctrl+S is the shortcut for saving a file in MS Excel.
Opening an Existing Workbook
Following steps are used to opening a workbook.
(i) Click File tab (A Pane will appear).
(ii) Click Open. The Open dialog box will appear.
(iii) Go to the directory in which our file is already saved.
(iv) Select our file to be opened.
(v) Click Open. Excel will open our selected file.
Ctrl + O is the shortcut for Opening an existing file in MS Excel.
Computer Guide for Class 9 PSEB MS Excel Part-I Textbook Questions and Answers
Q. 1. Fill in the blanks :
I. A workbook is a collection of the ……………….
(A). Cell
(B) Row
(C) Column
(D) Worksheets.
Ans. (D) Worksheets.
II. A cell is an intersection of a …………… and a ……….. .
(A) Row, Column
(B) Row, Cell Address
(C) Column, Formula Bar
(D) None of these.
Ans. (A) Row, Column
III. Fill handle in MS Excel can be used for …………. .
(A) Copying the Contents of a Cell
(B) Entering Number Series
(C) Entering Custom Series
(D) All of the above.
Ans. (D) All of the above.
IV. The Extension of MS Excel file is ……………
(A) .docx/.doc
(B) .xlsx/.xls
(C) .pptx/.ppt
(D) .txt.
Ans. (B) .xlsx/.xls
V. Which one of the following is not a view of MS Excel ?
(A) Page Layout
(B) Page Break Preview
(C) Normal
(D) None of these.
Ans. (D) None of these.
Q. 2. Write the Shortcut keys for following Tasks:
I. To Open an existing file in MS Excel : …………………….
Ans. To Open an existing file in MS Excel : Ctrl + O
II. To Save a file in MS Excel : ……………….
Ans. To Save a file in MS Excel : Ctrl + S
III. To Create a new file in MS Excel : ……………
Ans. To Create a new file in MS Excel : Ctrl + N
IV. To Fill Down in MS Excel : ……………..
Ans. IV. To Fill Down in MS Excel : Ctrl + D
V. To Fill Right in MS Excel : ……………..
Ans. To Fill Right in MS Excel : Ctrl + R
VI. To Copy contents in MS Excel : ………………
Ans. To Copy contents in MS Excel : Ctrl + C
VII. To Paste contents in MS Excel : ……………..
Ans. To Paste contents in MS Excel : Ctrl + V
Q. 3. Write True or False :
I. Address of Active Cell always displays in Name Box.
Ans. True
II. All Columns of MS Excel are represented by numbers starting with 1.
Ans. False
III. Cell containing formula displays the result of the formula, whereas the formula itself displayed in Formula Bar.
Ans. True
IV. MS Excel is a widely used Word Processor.
Ans. False
V. We can insert Number Series in MS Excel using Fill Handle.
Ans. True
Q. 4. Short Answer Type Questions :
Q. I. Define MS Excel.
Ans. MS excel is a spreadsheet programme developed by Microsoft. It is used for calculation purposes and maintaining data.
Q. II. What are the uses of MS Excel ?
Ans. Following are the some common uses of MS Excel :
(i) Excel can be used for mathematical calculations.
(ii) Data can be represented in a graphical format with the use of Charts.
(iii) Timetable can be prepared for school.
(iv) Salaries of employees can be calculated.
(v) Results of students can be prepared in Excel.
Q. III. Explain Ribbon in MS Excel.
Ans. Ribbon is a horizontal strip used to display the related commands. Ribbon is displayed below the tabs. Each tab is associated with a ribbon. It contains various commands related to that tab. These commands are grouped into groups on that ribbon.
(i) Tabs Tabs are the top section of the Ribbon and contain groups of related commands. Home, Insert, Page Layout, Formula, Data etc. are the examples of tabs.
(ii) Groups: These organize related commands. The name of each group appears below the Ribbon.
(iii) Commands: These appear within each group as mentioned above.
Q. IV. What is Name Box ?
Ans. Name box is a text box which is used to display the address of active cell or select the range of cells. It is also used to give names to range of cells.
Q. V. Explain Rows and Columns in MS Excel.
Ans. Rows are the collection of horizontal adjacent cells. These are named by numbers like 1, 2, 3.
Column is the collection of vertical adjacent cells and named as alphabets A, B, C and so on.
Q. 5. Long Answer Type Questions:
Q. I. What are the Basic Operations for MS Excel worksheet?
Ans. Basic operation for MS Excel Worksheet are :
The basic functions on Data that can be performed in the Excel Worksheet are :
1. Entering Data : Data can be entered in any of cell of worksheet. For entering new data in a cell, firstly place the cursor in the cell in which we want to enter data. Type the required data to be entered into our cell.
Data entry within a cell may contain two types of data :
(i) Entering Formula or Function: Any formula can be entered followed by equal (=) sign. For Example : = A1 + B1
(ii) Entering Contents other than Formula or Function: Data can be stored to describe data or facts. Any type of data can be entered without using any sign before contents. For Example: “Computer”.
2. Editing a Cell Data : The data can be edited by pressing F2 after selecting that particular cell or just double click within the cell the contents of cell can also be edited by using the Formula bar.
3. Deleting Data : To delete the entire contents of one or more cells, just press delete button from the keyboard after selecting the particular cells. In the case when partial contents of a cell are required to be deleted then F2 key or double click of mouse on the cell is used. The cell will be converted into edit mode. Arrow keys can be used in edit mode of cell and use delete or backspace key to delete the required contents.
4. Selecting Cells: Mouse is used for selecting the cells. Shift and arrow keys can also be used in combination for the same purpose.
Q. II. Explain the features of MS Excel.
Ans. Some of the features of Excel are as described below :
1. Easy Data Analysis: Excel provides advanced tools of data analysis like Sorting, Filtering, Charts, Pivot Tables, Goal Seek etc.
2. Conditional Formatting : Conditional formatting on data based on different rules and conditions can be done in excel. It helps in highlighting important facts from data or information.
3. Data Validations : Data can be validated based on certain criteria while entering.
4. Easy to Store and Find Data : There is no limit of the amount of information that can be saved in a spreadsheet. Finding data is easy using find command.
5. Application of Formulas: A lot of formulas can be used in excel. Performing calculations in Excel are easier and less time-consuming by using different formulas.
6. Data Protection : Sheets and workbooks of Excel can be protected using passwords for different access.
7. Organized Data : It is convenient to store our different data in multiple worksheets in a single Excel workbook.
Q. III. Write the differences between Workbook and Worksheet.
Ans. The differences between workbook and worksheet are :
| Worksheet |
Workbook |
| 1. Worksheet refers to a spreadsheet or a page of Excel. |
1. Workbook is a File created of Excel which may consist of number of worksheets. |
| 2. It contains rows and columns. |
2. It contains worksheet. |
| 3. There can be many worksheets in one workbook. |
3. No workbook can exist within a worksheet. |
| 4. No worksheet can be saved without workbook. |
4. Workbooks are saved individually with the extension .xlsx. |
| 5. Worksheets are used to have our data of one type in the form of spread-sheet. |
5. Workbooks are used to have different type of data to be stored in different sheets as a one file. |
| 6. Worksheet do not have extension. |
6. Workbook has an extension. |
| 7. Worksheet cannot open without workbook. |
7. Workbook can be opened without any worksheet. |
PSEB 9th Class Computer Guide MS Excel Part-I Important Questions and Answers
Fill in the Blanks :
1. An Excel Workbook consists of …….
(A) Worksheets
(B) Rows
(C) Columns
(D) Formulas.
Ans. (A) Worksheets
2. The actual value of a cell is displayed in ……. bar.
(A) Title
(B) Menu
(C) Formula
(D) None of these.
Ans. (C) Formula
3. ……………….. Formatting applies one or more rules to any cell you want.
(A) Formula
(B) Function
(C) Conditional
(D) None of these.
Ans. (C) Conditional
4. Format Command is available on ……….. Tab.
(A) Home
(B) Insert
(C) Data
(D) Formulas.
Ans. (A) Home
5. All Formulas must begin with an ……………… sign.
(A) Sigma
(B) Plus
(C) Equal
(D) None of these.
Ans. (C) Equal
6. A data in your worksheet can be arranged in an order using …………… .
(A) Formula
(B) Function
(C) Filter
(D) Sorting.
Ans. (D) Sorting.
Write True/False :
1. Excel is used to give presentation.
Ans. False
2. Worksheet and workbook are same.
Ans. False
3. The interaction column and row is called a cell.
Ans. True
4. The extension of excel file is .xlsx.
Ans. True
5. Self cannot be selected using Mouse.
Ans. True
6. There are only three type of views in Excel.
Ans. True
Short Answer Type Questions :
Q. 1. What are control buttons ?
Ans. These buttons are present in the upper-right of the window that allows us to modify the minimize, maximize/restore and close the workbook.
Q. 2. Explain File Tab.
Ans. This tab of Excel represents a menu which is used to perform file related operation. Basic operations present in this menu are :
(i) to create new excel documents,
(ii) open an existing file,
(iii) save, save as,
(iv) export,
(v) print file, etc.
Q. 3. Explain about Excel Tabs.
Ans. The name appeared for each related tab below the title bar of MS Excel. These tabs are called Menu bar. The various menus are: File, Home, Insert, Page Layout, Formulas, Data, Review, View, Help and a Search Bar with a light bulb icon. All these menus have sub categories.
Q. 4. What do you mean by dialog box launcher ?
Ans. This is a very small arrow located in the lower-right corner of a command group on the Ribbon. Command group related dialog box can be opened to perform advanced operations related to those commands.
Q. 5. What do you mean by leaf bar ?
Ans. It is used to display sheet names. It appears at the bottom of the working area. There can be multiple worksheets in one Excel file. This sheet bar explains the spreadsheet that is currently being used. We can add a new sheet or remove one using this part of Excel.
Q. 6. Write about three types of views.
Ans. Three types of views in Excel are:
(i) Normal View: This displays the Excel page in normal view.
(ii) Page Layout View: This displays the exact view of MS Excel sheets as these are going to be printed.
(iii) Page Break View : This shows page break preview before printing to adjust page layout easily.
Follow on Facebook page – Click Here
Google News join in – Click Here
Read More Asia News – Click Here
Read More Sports News – Click Here
Read More Crypto News – Click Here